Authentication
Before we can explore Scrive Flow, we need to be able to properly authenticate requests to the Flow API.
In this tutorial, we will be calling the GET /flow/folders/home/data_retention endpoint. This will return the current data retention settings if the API request was successfully authenticated.
Getting the authentication tokens
We can authenticate with Scrive's APIs using either OAuth 1.0, or via the session cookie received when logging into the web application. For simplicity, we'll only cover the OAuth method here.
We will be using the https://api-testbed.scrive.com/ environment for our testing here. However, these steps should work on any Scrive environment, including https://scrive.com/.
This tutorial uses a shell and curl to make API requests. By convention, $ at the beginning of the line refers to a shell prompt. You should not paste this character into your terminal.
Two ways to get OAuth tokens are described in the sections below. We can get them from settings in the Scrive front-end, or via calling an API end-point with your e-mail and password. The second option is only available without two-factor authentication.
Via front-end
Log in to https://api-testbed.scrive.com/new/login.
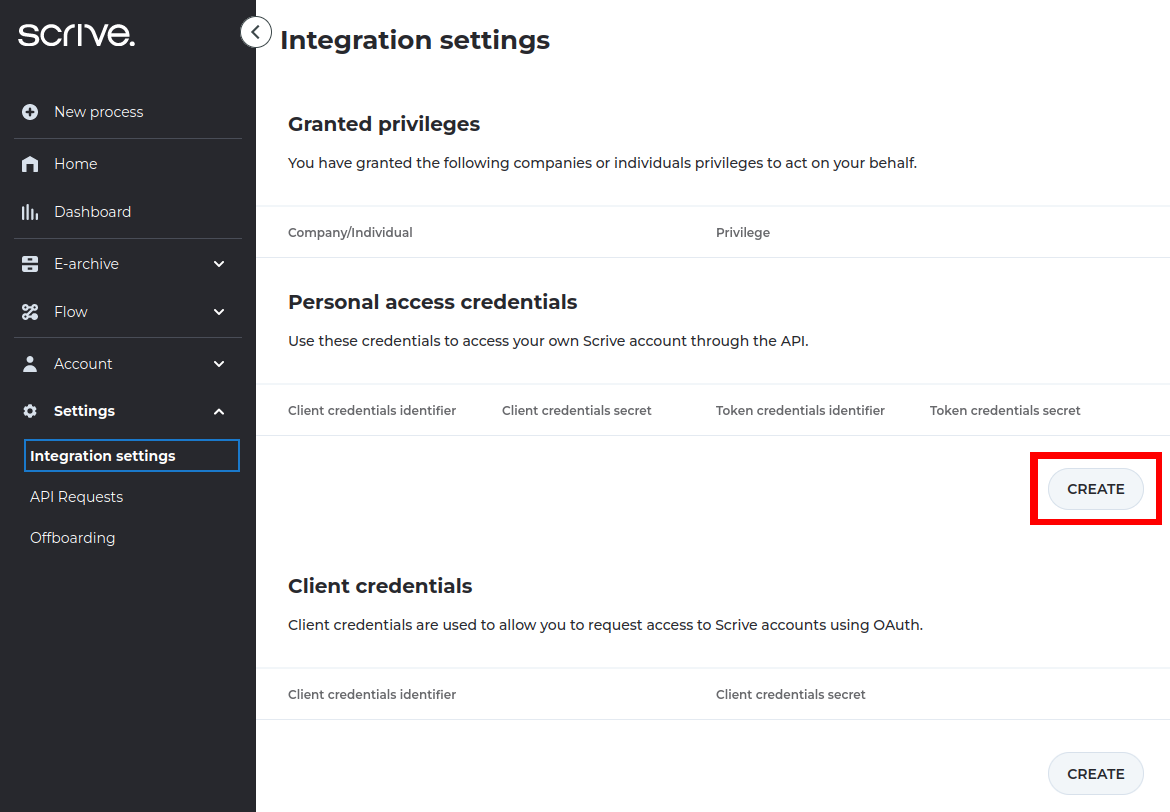
Go to Settings -> Integration Settings. In section Personal access credentials, create the access credentials. If access credentials already exist, they must be deleted and created anew.
Now, put the four values that were given by the front-end into shell variables, so they can be used in the next section to make a testing API call. These variables are named differently to what Front end calls them, but we can just copy the values in the order they appear in the table.
$ apitoken=3e6170e649b084ea_7337
$ apisecret=03460c00dc86d756
$ accesstoken=0f081cdc6c0145c8_8674
$ accesssecret=3b645a8d97d78b72
We can now skip to the Making the request step.
From e-mail and password
This method of obtaining OAuth tokens works only with two-factor authentication disabled.
Firstly, set some local variables with the Scrive host URL, your e-mail and password:
# Change the user email and password to your user account
$ url="https://api-testbed.scrive.com/api/v2/getpersonaltoken"
$ email="demo@scrive.com"
$ password="password123"
Next, get OAuth credentials by calling the /api/v2/getpersonaltoken endpoint. This is not a part of the Flow API, but the regular Scrive API and the Flow API share common authentication mechanisms.
$ curl -X POST "${url}" \
  --data-urlencode "email=${email}" \
  --data-urlencode "password=${password}"
We should see a successful response containing something like the following:
{
  "apitoken": "3e6170e649b084ea_7337",
  "apisecret": "03460c00dc86d756",
  "accesstoken": "0f081cdc6c0145c8_8674",
  "accesssecret": "3b645a8d97d78b72"
}
We can now make shell variables out of these numbers, so that you can use them to make API calls later:
$ apitoken="3e6170e649b084ea_7337"
$ apisecret="03460c00dc86d756"
$ accesstoken="0f081cdc6c0145c8_8674"
$ accesssecret="3b645a8d97d78b72"
Making the request
In this section, we will use the OAuth credentials to authenticate with the API. First, we construct an OAuth 1.0 Authorization header:
$ auth_header="Authorization: oauth_signature_method=\"PLAINTEXT\", \
  oauth_consumer_key=\"${apitoken}\", \
  oauth_token=\"${accesstoken}\", \
  oauth_signature=\"${apisecret}&${accesssecret}\""
Next, we define base_url to link to the appropriate Scrive environment, if we didn't already do it:
$ base_url="https://api-testbed.scrive.com"
We can now use curl to call a Flow end-point:
$ curl -i -H "${auth_header}" "${base_url}/flow/folders/home/data_retention"
We should see something similar to the following:
HTTP/2 200
server: nginx
date: Tue, 02 Jan 2024 12:07:27 GMT
content-type: application/json;charset=utf-8
vary: Accept-Encoding
set-cookie: lang="en"; Path=/; Max-Age=31622400; Secure
set-cookie: lang-ssn="en"; Path=/; Max-Age=31622400; Secure; SameSite=None
strict-transport-security: max-age=31536000
access-control-allow-origin: *

{"delete_trashed":null,"trash_completed":null,"trash_failed":null,"trash_timed_out":null}
The important part of this is the HTTP/2 200 status code and the JSON object response on the last line. If you received a 200 response and a JSON object response, then you have successfully authenticated.
If you see something like the following (with 401 status code) then you have likely made a mistake and should go through these instructions again:
HTTP/2 401
server: nginx
date: Tue, 02 Jan 2024 12:19:08 GMT
content-type: application/json
strict-transport-security: max-age=31536000

{"code":401,"details":null,"message":"The provided OAuth token is not valid","type":"invalid_authorisation"}
Further Reading
If you would like a deeper knowledge of the topics covered here, then the following articles may be useful. You are not required to read them in order to understand the rest of this guide.